

How To Stabilize Video In Windows Movie Maker
What does stabilize video mean? And how to stabilize shaky video?
When recording videos using a photographic camera or phone, virtually people exercise not use tripods or gimbals, but rather hold their device by paw. Due to hasty body movement and the natural unsteadiness of the hand, this results in a distortion of the recorded video, where the footage becomes shaky and wobbly. The resulting shaky video not simply reduces video quality but can also distract the viewer from the message or story in your video.
If yous do not want to invest in expensive photographic camera gear to stabilize shaky video, yous will be pleased to know the way to fix the shaky video bug caused past handheld recording.
In this post, I'd like to show all of you 5 unlike ways to stabilize a video. Y'all tin compare them and pick up on to stabilize your own shaky video easily.
Now, let's get started...
- Editor'south Choice: Filmora Video Editor - Best Video Editing Software for PC/Mac
- Part ii. How to Stabilize Shaky Video in iMovie [Only for Mac Users]
- Function three. How to Stabilize Video in Windows Film Maker [Only for Windows Users]
- Function iv. How to Stabilize Video in After Furnishings [for Professionals]
- Role 5. How to Stabilize Shaky Video Footage Online
Filmora Video Editor - Best Video Editing Software for Beginners & Semi-pros [Editor's Pick]
Filmora Video Editor or Filmora Video Editor for Mac is loved by videography professionals and first-timers alike for its ease-of-use, beautiful interface, and loftier-quality results. With this powerful software, you tin can not only gear up shaky video simply besides trim, cutting, crop, join videos and also add filters and more than 500+ video effects.
Sounds great? Permit'due south accept a brief wait on the bully features of Filmora Video Stabilization Software:

- Stabilize a shaky video within 3 uncomplicated steps: import - stabilize - export & share;
- Full range of video editing tools including color tuning, sound mixing, video splitting, trimming, greenish screen, PIP, video enhancing, etc;
- 1000+ special effects to create a cinematic video prune hands, including transitions, filters, customized titles, text, overlays, elements, etc;
- Save, export and convert videos to all popular formats, including MP4, MOV, M4V, FLV, MKV, etc.
- ...
How to Stabilize Shaky Video Footage with Filmora Video Editor?
Step 1. Launch & Import Shaky Video
Assuming y'all've already downloaded and installed the program, open Filmora Video Editor and import your shaky video file. You tin can do this by either clicking the Import button to select the video file(s) from your storage binder or but past elevate-and-driblet to the timeline.

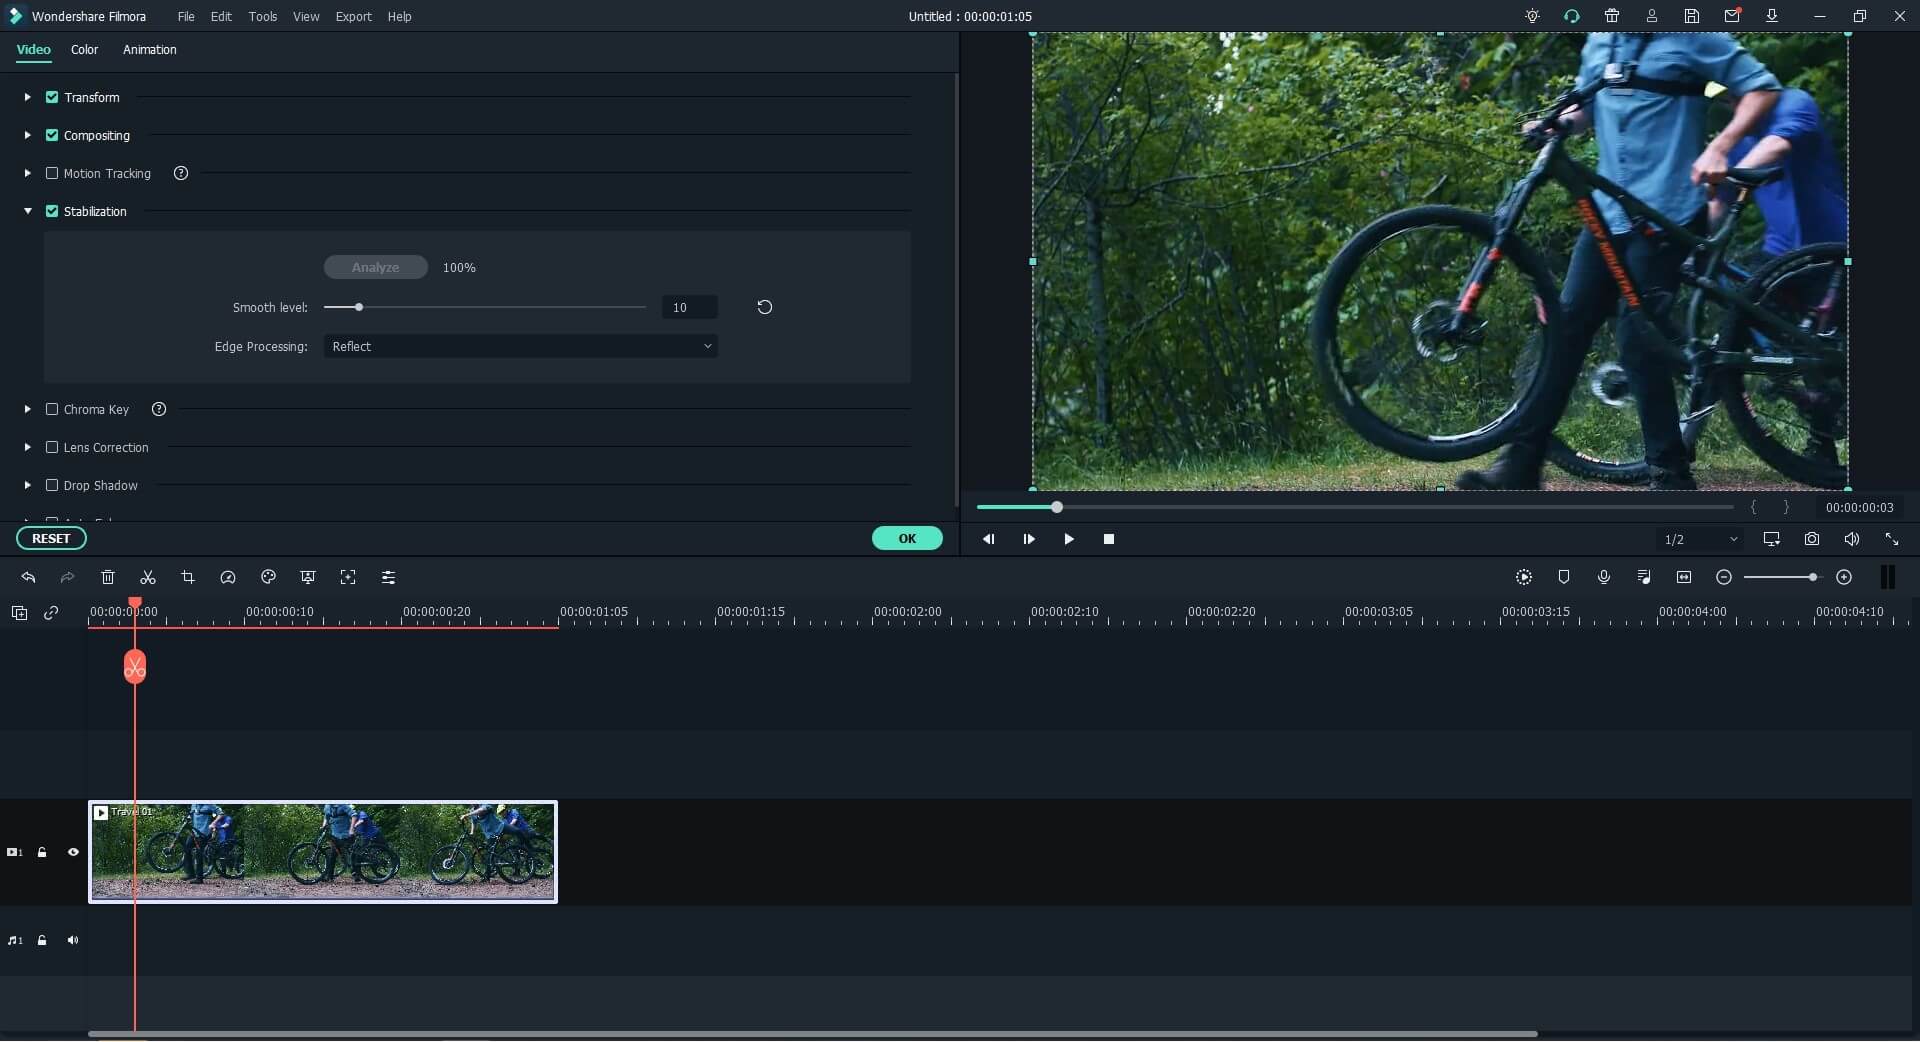
Step 2. Stabilize shaky video
Right click on your video in the timeline and choose "Stabilization" to open the video stabilization window.
Now, tick the option of "Stabilization" > "Analyze" push button to automatically analyze and stabilize the shaky video. When the process is complete, play the video in the preview window to run across the result. If y'all need to accommodate the caste of stabilization, use the slider labelled "Smooth Level" to increase or reduce the stabilization upshot.
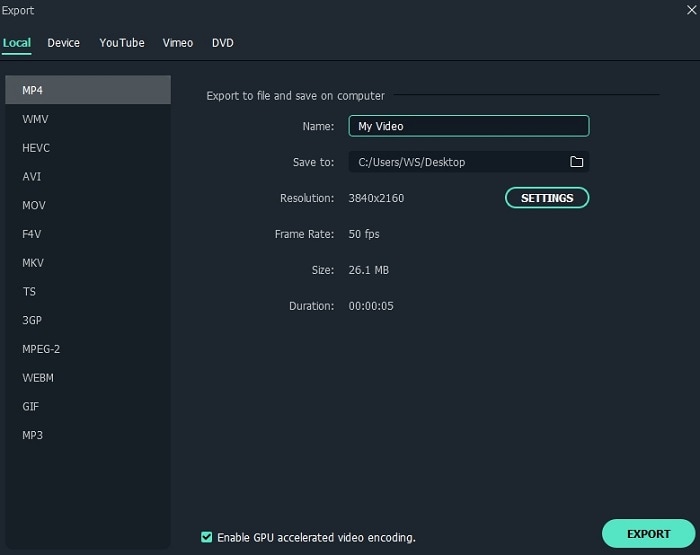
Step iii. Save & Export
Once you are finished stabilizing, you lot tin proceed to farther edit your video to add filters or video effects. If you lot are satisfied with the results, click "Consign" to save your stabilized video in the format of your choice.
If not, you can follow the below tutorials to edit or customize your video before exporting:
- How to edit videos like a pro
- How to Create PIP Consequence Video (Overlay Video)
- How to Create An Crawly Video Intro
How to Stabilize Shaky Video in iMovie?
Another software tool you can use to stabilize shaky recorded videos is iMovie for Mac. iMovie's Video Stabilization feature lets users fix video shake and also correct rolling shutter distortion that is caused by fast hand move when recording videos. Install the official version from Apple's App Shop free of charge.
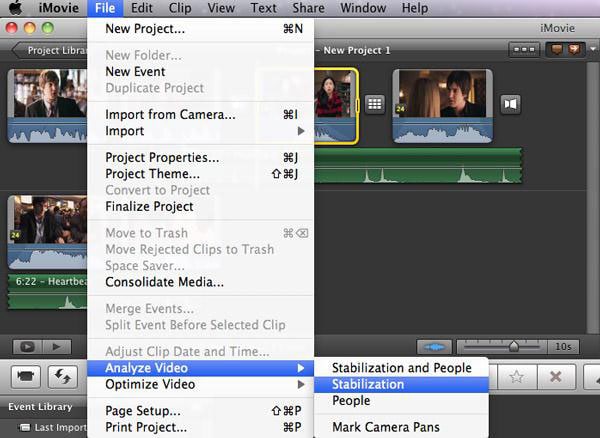
1. Open up iMovie and import your shaky video to the issue browser and then add them to the timeline. To import videos either navigate to the binder location or use drag-and-driblet.
2. On the timeline, select the video file you want to stabilize and then click on the stabilization icon in the Adjustments Bar above the viewer. Side by side, click on the Stabilize Shaky Video tick-box and so drag the slider to increase or reduce the amount of stabilization practical to the video.
3. Play your video to preview the stabilization effects and when satisfied, save the video.
How to Stabilize Video past Using Windows Movie Maker?
Windows Movie Maker offers bones video editing tools that include video stabilization. However, it is worth noting that Windows Movie Maker does not come up bundled with Windows 10 and is merely available if y'all have Windows Essentials 2012 on your PC, and you're using Windows 8 or higher. (You lot might desire to know the all-time alternative to Windows Movie Maker)
The process of stabilizing shaky videos with Windows Motion picture Maker is straightforward and only involves two steps:
i. Open Windows Pic Maker and click on the Add together Videos and Photos icon to import the video file yous want to stabilize.
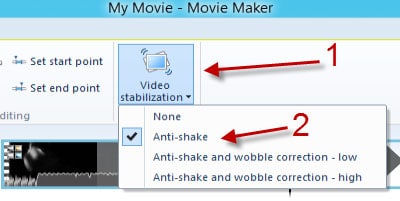
two. On the video timeline, select the portion that contains shaky video then click on the 'Edit' tab to admission the Video Stabilization tools: Anti-shake, Anti-shake & wobble correction (low), and Anti-shake & wobble correction (high). Utilise the tool that all-time stabilizes your video.
Now, you tin play the video to preview the results. Repeat the process until you lot are satisfied.
Adobe After Effects - Stabilizing A Shaky Video inside 4 Steps
In addition to existence a pop compositing and motion graphics software programme, Adobe Later Effects is another great tool for stabilizing shaky video. While it is capable of producing astonishing results, information technology is not easy to use and is meliorate suited to videography professionals.
In the footstep-past-footstep guide beneath, y'all volition find how to utilize Adobe's Warp Stabilizer VFX tool to set shaky footage.
1. Import the video: Add the video y'all want to stabilize to the interface by navigating to File > Import. Y'all can alternatively elevate-and-drop to the project window.
2. Create a new composition: Drag-and-drib your video onto the "Create A New Limerick" push button at the lesser of the window. This will bring up a new composition tab and timeline. You have the choice of previewing the footage in the Preview window before proceeding to the side by side step.
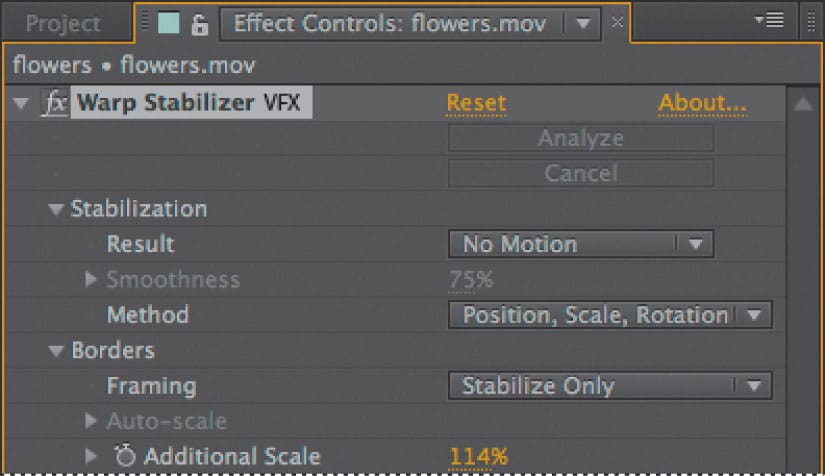
3. Stabilize your video: Select your video layer in the Timeline panel, and choose Animation > Warp Stabilizer VFX. The stabilization effect is applied immediately. Preview the video once the effect has finished processing. If you're still not satisfied with the results accommodate the settings in the 'Result Controls' panel to brand reduce video milkshake even further.
4: Salvage your video: Export your stabilized video into a format of your pick.
For more info well-nigh other Adobe editing tools, y'all tin go to another mail to learn the detailed info about Adobe video editing software.
How to Stabilize Videos Online?
When for some reason y'all are either unable or unwilling to install professional video editor on your computer, there are several online video stabilizer tools you tin employ. Stabilizo is one of many online video stabilizers that lets users correct video shake problems. To rapidly stabilize a shaky video online for complimentary with this tool, follow the steps below.
Note: Please note that this should be your last resort as browser-based software tools are not only unreliable but can also expose your computer to malware and viruses.
1. Open Stabilizo on your browser and upload your shaky video. Notation that the maximum file size yous tin can upload is 500 MB. Since this is an online tool, it may take a long time to upload depending on website traffic, the size of your video and your net speed.
2. The file will automatically first stabilizing. When it's finished, choose a destination folder to save the video.
Comparison: Which Method is Suitable for Y'all?
The above 5 methods will all gear up a shaky video but the quality of results will vary. The results tin be summarized as follows:
1. While iMovie is like shooting fish in a barrel to apply and comes with a decent number of tools, it doesn't do the best job of stabilizing footage. Information technology is also limited past the corporeality of video file formats available within Apple's ecosystem.
two. Windows Moving picture Maker too does not perform well in regards to video stabilization and is no longer supported by Microsoft. Installing it required a lengthy process which makes it not worth the while.
3. Adobe Afterward Effects proved to be a powerful and capable tool that produced very high-quality results. However, the software is quite expensive and felt more than suited to tech-savvy pros, which means it is likely to overwhelm beginners. It is as well resource-intensive and requires college-end computers.
iv. Stabilizo has a simple, very piece of cake-to-use interface. However, it took more than an hour to stabilize a small-sized shaky video, and that after several failed attempts. The website also lacks a security certificate which raises safety concerns.
Overall, Filmora Video Editor delivered the all-time video stabilization results. It is straightforward to use and economical on system resources. It is also supported on both Windows and Mac. To use Filmora Video Editor to finer stabilize your shaky video, you need to purchase the full version or download your free trial version Here.

Source: https://www.iskysoft.com/video-editing/stabilize-shaky-video.html
Posted by: hoguewomed1950.blogspot.com
0 Response to "How To Stabilize Video In Windows Movie Maker"
Post a Comment