

How To Enable Intel Virtualization Technology In Windows 8.1
This weblog discusses quick and easy steps to enable Intel VT-x or AMD-V in your Windows ten and Windows 8 operating organization. Intel VT-ten or AMD-Five featured processors allow you to run virtual environment such every bit Virtual machines, mobile phone emulators(If you want to develop mobile applications in Microsoft Visual Studio) etc.
What is Intel VT-x and AMD-V?
Intel VT-x and AMD-5 are processors manufactured by Intel and AMD Corp. that back up virtualization. Not all the processors manufactured by Intel or AMD will take Intel VT-x and AMD-Five. So, if you plan to purchase a new processor, please cheque the official processor specification folio to see if supports Virtualization.
For Intel, to go to the Processor specification page, Google search with the name of the processor. Most of the time kickoff or the second search issue will exist the official processor specification page. For AMD, the product specification page is difficult to find. If you Google search for AMD processor, yous will run across many pages other than AMD official documentation page. Click on a couple of pages that provide Specification and look for Hardware Virtualization. If information technology says yes, it mean that information technology supports Virtualization.
For case, to check if Intel 6800HQ processor supports Virtualization, you can visit the official Intel 6800HQ production specification page and search for Intel® Virtualization Engineering science (VT-x). If yous run across yes, the processor supports Virtualization. Below is the screenshot of the specification page for the Intel 6800HQ processor.
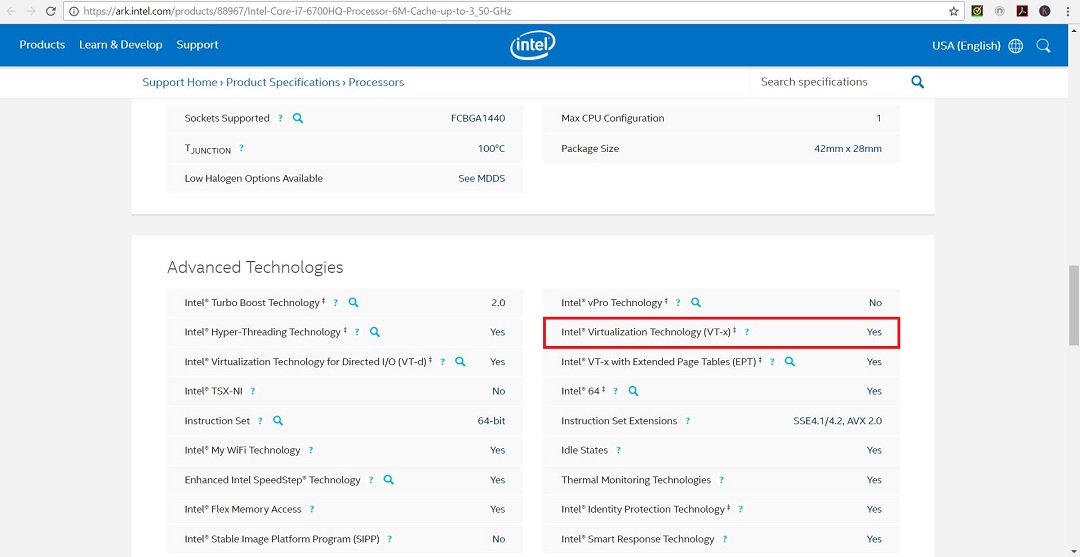
Intel 6800 HQ processor specification webpage screenshot
Do you need Intel VT-x or AMD-5 processor for Virtualization?
The answer is Yes if you desire to run 64 bit operating system. For 32 fleck operating organisation, Intel VT-x or AMD-5 is non required. Merely, in my experience processors without Intel VT-x or AMD-V requite poor performance and the systems slows down. And then it is highly recommended to take processors that back up Virtualization.
If yous want to cheque if your processor supports Virtualization from within Windows, please follow my page How to find out if Intel VT-x or AMD-V Virtualization Technology is supported in Windows x, Windows 8, Windows Vista or Windows 7 machine
Besides this, Microsoft Hyper-V, which is available for free in Windows pro and to a higher place versions requires Intel VT or AMD-V. Without this, yous wont be able to utilise Hyper-V.
Exercise you take to enable Intel VT-x or AMD-Five in BIOS or UEFI?
Unified Extensible Firmware Interface (UEFI) is a modern updated version of BIOS. UEFI will eventually replace BIOS but currently almost all of the laptops back up both UEFI and BIOS. if you accept a laptop which was shipped with operating system such every bit Windows, it will have UEFI setup done by default. For such laptops, booting to UEFI is easy compared to BIOS. For such laptops, use UEFI method described below. Scroll down to How to Enable Intel VT-x in BIOS? to brand changes in BIOS settings instead of UEFI
Virtually processors these days have Virtualization support. In AMD-V processors, you don't accept to enable them in BIOS considering they are enabled past default. In AMD processors you might not fifty-fifty see any selection to enable or disable virtualization.
For Intel processors, most of the time Intel VT-x is disabled past default. To apply Intel VT y'all will have to enable it in BIOS.
How to enable Intel VT-x in UEFI?
About all of the mod laptops have UEFI instead of BIOS. BIOS is non completed removed but is now termed as legacy BIOS. At that place is no need to boot into BIOS Utility to modify BIOS settings. Booting to BIOS Utility is confusing and ofttimes tricky. But with UEFI, it is very simple. Lets meet how it is done in Windows ten.
Pace 1- For Windows 10, Go to Windows Settings-> Update & Security
Get To start, Windows Settings either by Start->Settings, or by typing Settings in the search box in the task bar. Then click on Update and Security
For Windows 8, Swipe from the right to open the charms bar. Tap or click Change PC settings. Choose Update and recovery from the list on the left (or General prior to Windows 8.1), and then choose Recovery. Locate Advanced startup, at the bottom of the list of options on your right. Tap or click on Restart now. Look through the Please look message until Avant-garde Startup Options opens. From here go to Footstep 3. process is the aforementioned for Windows 10 and Windows viii.

Windows 10 Settings dialog box screenshot
Step ii- Click on Recovery on the left pane
Click on Recovery on the left pane and nether Advanced Startup, click on restart now as shown below in the screenshot.
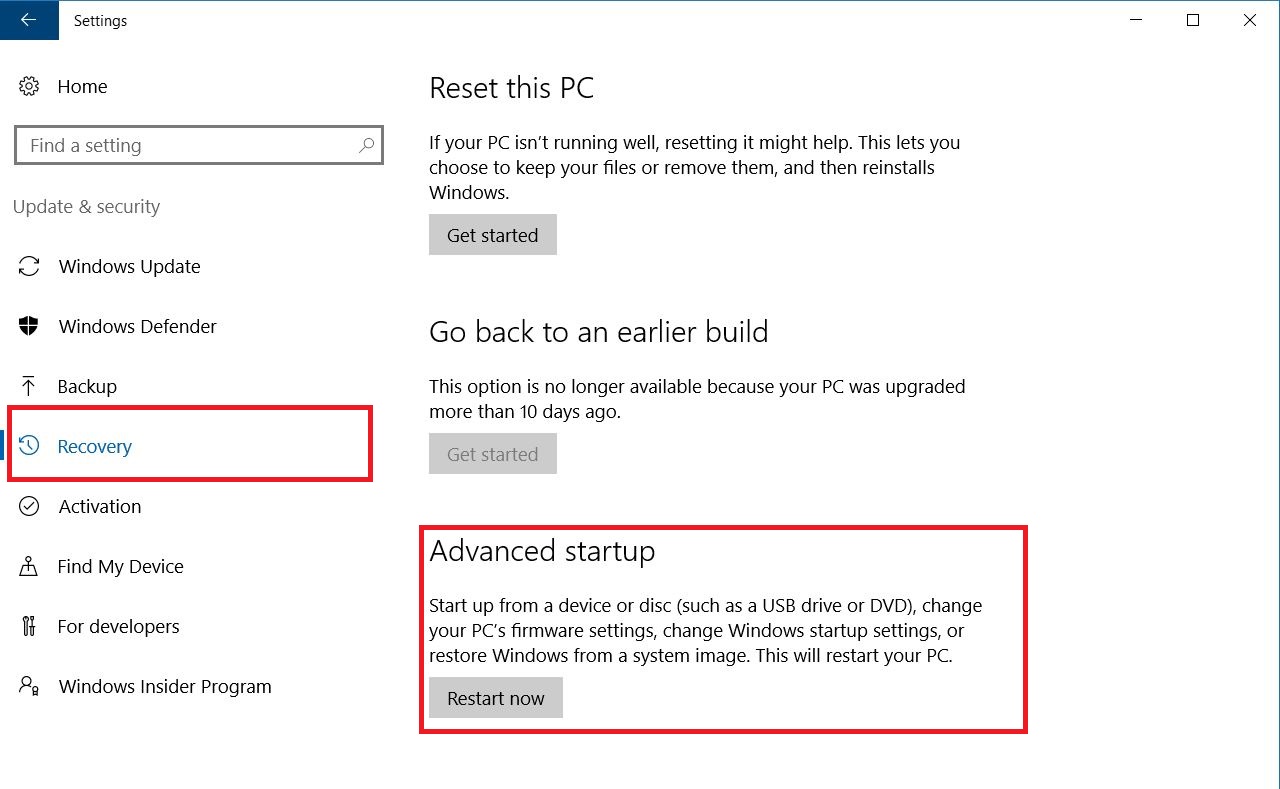
Windows 10 Settings – Update and Security- dialog box screenshot
Step 3- Wait for the organization to restart and click on Troubleshoot
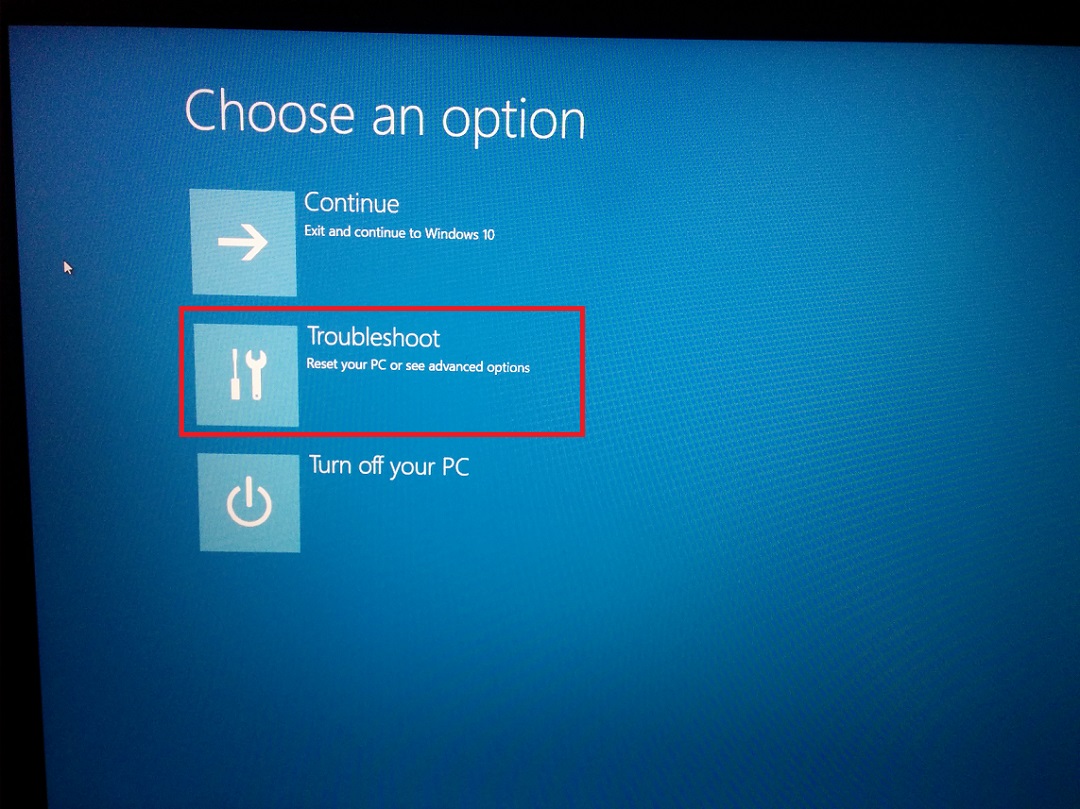
UEFI boot troubleshoot screenshot
Step 4- In Troubleshoot, Click on Advanced Options

UEFI kicking Troubleshoot – Advanced Option- screenshot
Step 5- In Advanced Options- Click UEFI Firmware Settings
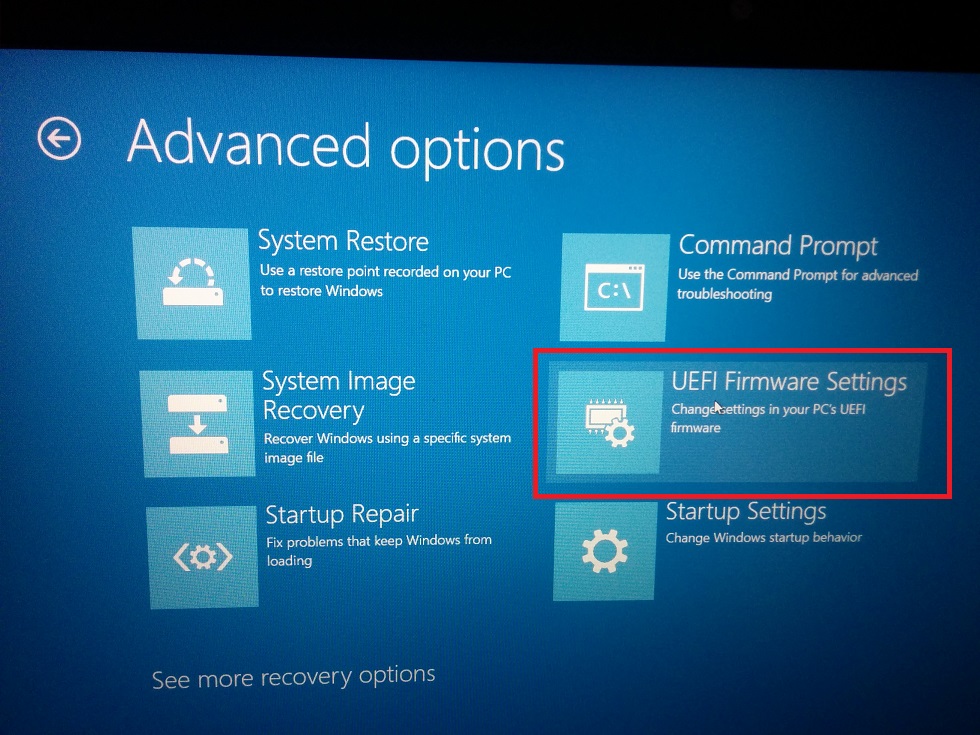
UEFI kicking Troubleshoot – Advanced Selection- UEFI Firmware Settings screenshot
Stride 6- UEFI Firmware Settings – Click on Restart

UEFI boot Troubleshoot – Advanced Selection- UEFI Firmware Settings – Restart Confirmation screenshot
Step 7- After restart yous will Enter BIOS
In BIOS change the settings from Disabled to Enable for Intel Virtualization Technology. After changing the value from Disable to Enable, press F10 (or whatever is the option for your organization. Look in the side or at the lesser to find the key to relieve and restart for your organisation) to save and restart. That's it you are done.
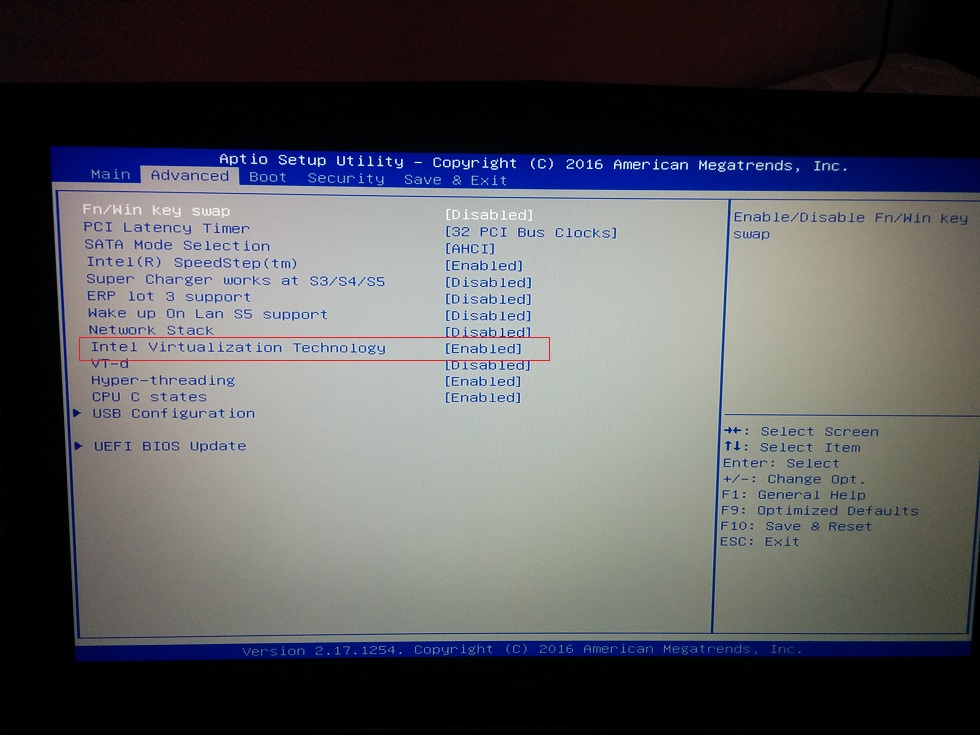
UEFI BIOS Screenshot
How to Enable Intel VT-x in BIOS?
BIOS acronym for Basic Input/Output System is a firmware which is stored in a ROM (read Simply Retentiveness) bit on the motherboard. BIOS has a set of instructions that allows the computer to kick correctly. It is as well used to initialize the hardware such as keyboard, HDD, processor, etc…
Pace 1- Enter BIOS setup utility
BIOS has a setup utility that allows you to set or unset a particular property. For case, nigh mutual is to boot from CD ROM first which in most of the cases is ready to boot from HDD (Hard Drive).
You cannot enter BIOS Utility when you have already booted into windows or Linux OS. You will take to restart your estimator and there are is a combination of primal strokes that y'all will have to press after the figurer powers on but earlier it begins to boot from HDD or CD ROM. You will take to be very quick after y'all power on your computer, else, the calculator will begin to boot from HDD. In that example, shout down or restart your system and try again.
Unfortunately, every motherboard manufacturer or laptop manufacturer will have a different primal combinations of entering into BIOS Utility. This y'all will accept to discover out by searching Google and typing Keywords similar How to enter BIOS in MSI. Here instead of MSI, it could be Sony, HP, Lenovo etc.. based on your laptop or desktop. And so ready through a couple of suggested pages and you will get the reply.
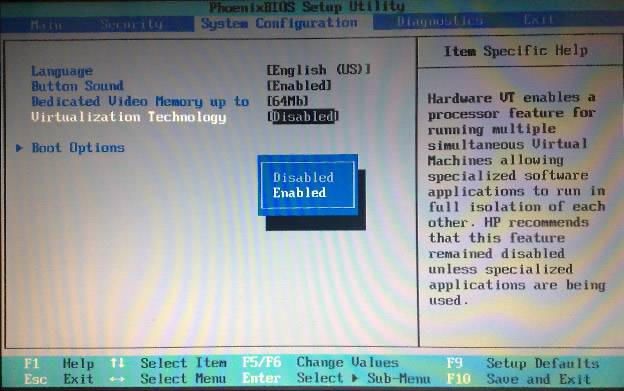
Step ii- Change Virtualization Technology from Disabled to Enable
Later on you accept entered BIOS setup Utility, using the arrow keys, look for Virtualization Technology which should mostly likely exist in Arrangement Configuration Tab or Avant-garde Chipset settings. This will change depending on the manufacturer. In any case look for Virtualization Technology. Utilise the arrow keys to Modify from Disable to Enable. You then have to salvage and exit. In near of the cases, you will accept to press F10 to salve and exit. Merely it tin vary. Look at the bottom of the BIOS Utility screen, you will encounter the key which saves and exists.
That's it. You are done. VT is enabled.
That'south information technology in this post. If y'all have whatever questions, delight leave a comment beneath. I will reply. Thanks.
Source: https://www.shaileshjha.com/step-by-step-guide-to-enable-intel-vt-x-or-amd-v-in-bios-or-uefi-in-windows-10-and-windows-8/
Posted by: hoguewomed1950.blogspot.com
0 Response to "How To Enable Intel Virtualization Technology In Windows 8.1"
Post a Comment