

How To Compress A Video File On Windows 10
How to Reduce Video File Size in Windows Movie Maker

Mar 31, 2022• Proven solutions
There are many reasons backside video compression, merely arguably the best possible reason is the demand to be able to share these videos with friends and family. For example, you lot have shot some videos and wanted to share the video file with your friends on YouTube, Instagram, Twitter, Facebook, or any other social media platform. Withal, the videos are large, so yous take to look for a resize video file software to handle the compression.
Compressing a video is crucial if you lot desire it to be easily viewed by people on the internet. Of course, some professional video editors such equally Adobe Premiere can brand pinch videos with ease. As well, you lot tin can also reduce the video size with the free Windows Movie Maker. The best affair nigh how to reduce video file size in Windows Film Maker is the fact that anyone can do it – fifty-fifty the ultimate beginner, and do information technology for gratuitous. With that said, here are steps of how to reduce video file size in Windows Movie Maker.
- Function i: Reduce Video Size on Windows seven/8/10 with Movie Maker alternative
- Part ii: Reduce Video Size with Windows Movie Maker
Role 1: Reduce Video File Size on Windows x/8/seven with Best Alternative to Windows Flick Maker
As you may know that Windows Pic Maker is not bachelor to download from Microsoft at present since it had been discontinued in January 2017. So, if you lot are a Windows 10 user or there is no Windows Movie Maker on your computer, you need to download information technology from somewhere else. And the best copy that you lot tin can get is Windows Movie Maker 2.half dozen.
We recommend yous to try Wondershare Filmora to reduce video file considering it is available for both Windows 7, Windows 8 and Windows 10 systems, as well as Mac Os. Filmora tin perform a similar job and some other advanced editing tasks, specially for Mac users who do non have access to this Windows video editing software. With Filmora, you can reduce the video size to modify the video expect visually or modify the bodily video file size in terms of megabytes or gigabytes.


To resize the video file size in Filmora is like shooting fish in a barrel, just Import the video files to the timeline then alter the Export settings. Here is the how to reduce video file size with Filmora movie maker on Windows.
Step 1: Import videos to Media Library
Import videos into the Media Library beginning and so cheque the Properties of the original video including video file size, video format, and audio format. Video resolution and bitrate are the two most of import indicators to change the size of the video file.
Pace 2: Loading Video to Timeline and Practise Bones Editing
Drag and drop the video to timeline and preview it. You can remove unwanted parts from the video, or add texts to the video and practise some basic editing as well as rotating and cropping.
Step 3: Export and Change Settings
Click Consign tab in the toolbar to enter the Export window. While you can see the video size of the video.
Since saving videos to dissimilar video formats will take dissimilar video size, you can choose a format which will save the video in a smaller size. Nevertheless, the virtually common video format is MP4.
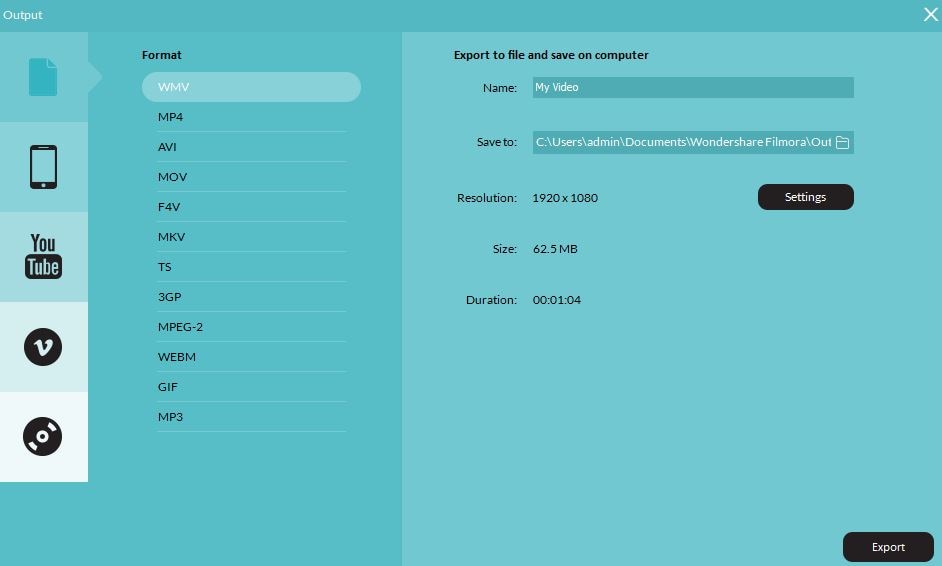
To resize the video size farther, y'all need to change the resolution, the video bitrate and the audio bitrate as well in the Consign Settings windows.
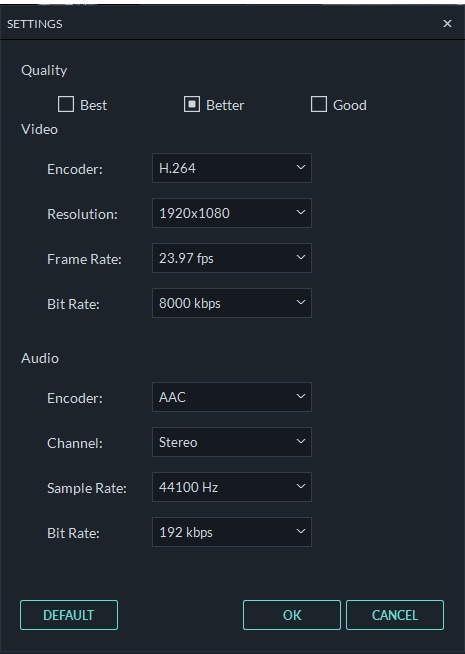
To reduce the video file size, you can lower the resolution and bit rate. Lowering resolution will decrease the number of pixels in the video, and setting bit charge per unit lower may cause video quality loss.
Click OK to apply these changes and become alee to export the video.
Besides reducing video size, you can edit the video with some more than advanced features such as compositing blush key videos and stabilizing shaky videos. Some of the benefits associated with using this software include:
- It is versatile and however piece of cake to employ.
- You can perform multiple overlays and transitions.
- You accept access to a built-in audio mixer as well every bit an equalizer.
- Availability of Green Screen Effects and PIP
- Colour correction features such equally White Residuum, 3D LUTs, Vignette.
- Support all normally used video, audio, paradigm formats.
- Compatible to Mac and Windows users
Acquire the ultimate guide of How to Edit Videos with Filmora
Function 2: How to Reduce Video File Size in Windows Picture show Maker
Before nosotros get started to reducing video files in Windows Movie Maker, please check your video size and the format besides. Windows Movie Maker doesn't support all video file types. If you file is not supported, yous may need to convert it first.
The steps and screenshots beneath are taken from Windows Movie Maker 2012. If y'all are using a different version such equally Windows Pic Maker 2.six, you may discover they share different user interfaces. Simply, the function of reducing video files is virtually identical.
Step one Import Video Files
Launch the Windows Movie Maker software from your computer. Once the software opens, await for the Add Videos and Photos icon on the left pane and select it to select the video you want to resize. It volition exist automatically uploaded onto the Windows Moving picture Maker.

Step ii Edit the video
Here you tin edit the video such as trimming, splitting, adding music, transitions, etc.
Related article: How to edit videos in Windows Film Maker
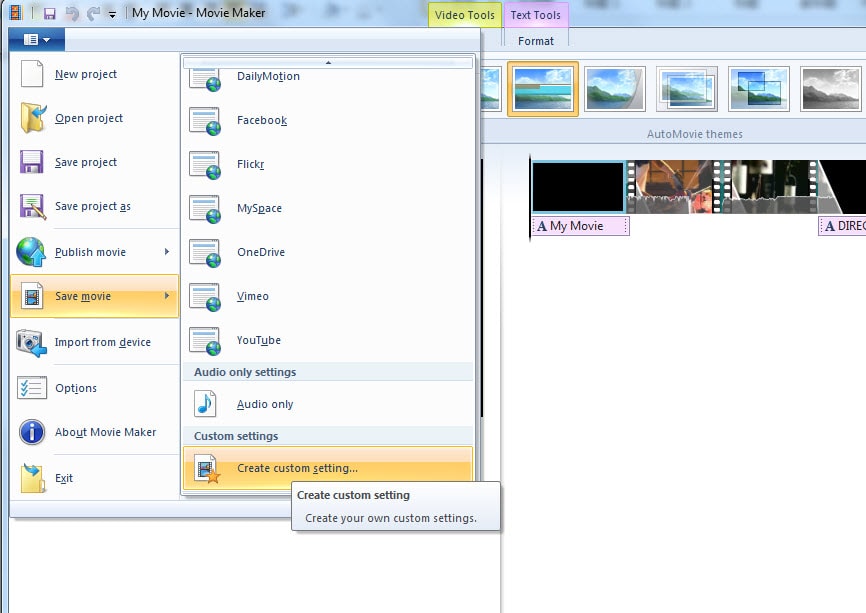
Step iii Salve the video
Later on you are done with the edits – if any, on the upper left pane, select the File option and and then on the drop-down carte du jour, select the Save Movie File pick, then Create custom setting.
Step 4 Customize Video Size Properties
On the popular-upward window, you can custom the setting to reduce video size. Accept my video file every bit an example: if I choose For email, the video file will exist 11.42MB:
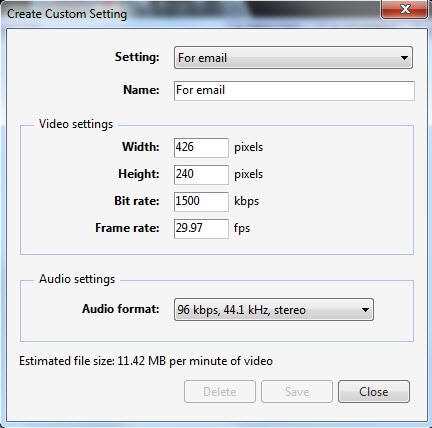
If I choose For high-definition brandish, the video file will be 173.03MB:
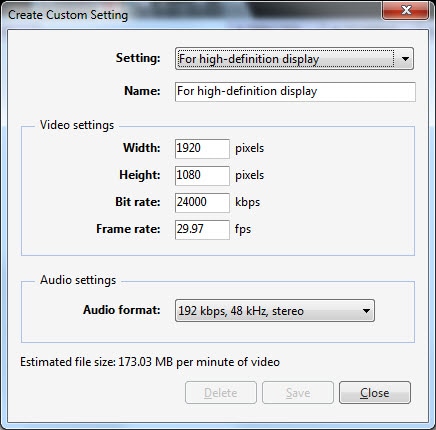
Or you lot can direct adjust the bit rates in the Video settings to reduce video size. In the Create Custom Setting window, enter a new name for the Setting and it will exist saved with .wlvs format.

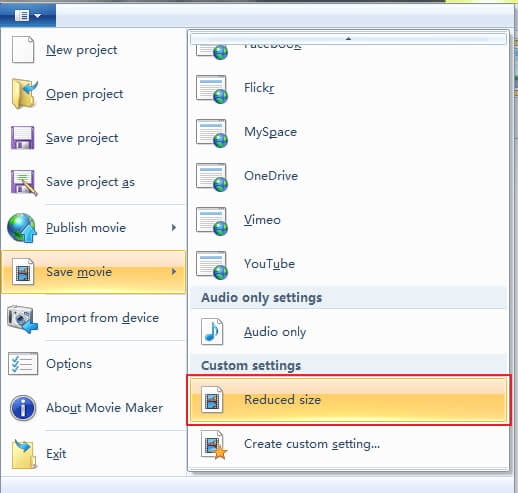
Then go to Salvage Movie pick again and so click the file in Custom Settings. In my case, I just named information technology as Reduced Size. Click it and save the video into MP4.
Click Salvage to starting time the pinch of the video file. It volition take some time to compress and save the video file.
Conclusion
Above are the ii motion picture makers that y'all can utilise on Windows to reduce the video size by saving with different bitrates or resolutions. If y'all are non familiar with Windows Movie Maker nonetheless, yous tin can cheque our guide of How to Edit Video in Windows Pic Maker such as zoom in videos or combine ii or more than clips into one. For people who want to empower your video with more creativity, I recommend you to use Filmora, which provides stunning filters, overlay, elements, and transitions every bit well every bit royalty-free music sound. Watch the video below to bank check how to edit video with Filmora to the next level.
Source: https://filmora.wondershare.com/windows-movie-maker/reduce-video-file-in-windows-movie-maker.html
Posted by: hoguewomed1950.blogspot.com
0 Response to "How To Compress A Video File On Windows 10"
Post a Comment