

Automatically download TV show episodes as soon as they air - hoguewomed1950
Having a reliable and fast internet connection is an low-cost luxury that opens up a lot of possibilities. Particularly serial publication and film lovers are able to download or stream their favorite shows operating theatre movies. Services like Netflix in combining with streaming devices such American Samoa Google Chromecast or Virago Evoke TV offer a expectant experience and are deserving the smallish investment. But what if the show you actually neediness to watch isn't on Netflix? Or if Netflix International Relations and Security Network't getable in your nation? Well, then you have the option to lookup the network for the episodes and download (or rain bucket) them yourself. By doing so, you mightiness download copyrighted material. IT's up to you to do that.
If you'ray pursuing lots of different shows, then you need to search for a lot of new episodes every week to stay along top of everything. That can be selfsame time-consuming and it's not easy to support an overview. With a slim bit of money and time, however, you can completely automate this process and lean back patc all your shows are being downloaded as presently as recently episodes are available.
Download new episodes atomic number 3 shortly as they'ray available using a Boo Pi and Kodi [Mac & Windows]
So how does this wreak? The basic setup is a computer (therein case a Raspberry Pi) that checks 24/7 if new episodes are forthcoming and downloads them to your hard repulse, media server or other kinds of depot. If you flux that with media streaming apps like Plex Beaver State Kodi, then you end up having a fully automated TV show off experience. Under is a graphic showing an model of much a apparatus. Preceptor't be intimidated by the steps you don't understand. After interpretation this guide, everything bequeath add up.
This article, divided into several parts, leave guide you through the healthy process of setting everything sprouted. If you have some BASIC programming knowledge, this should be fairly easy. But even without such skills, you should be able to follow the steps (it's mostly copy and spread).
IT's important to acknowledgment that this guide mentions Usenet, which can be old to download copyrighted material. We're only interested in what's possible with Usenet. Information technology's completely upward to you what to do thereupon entropy and how to use Usenet. Google is your friend if you want to know more most it.
A basal exemplar of a setup:
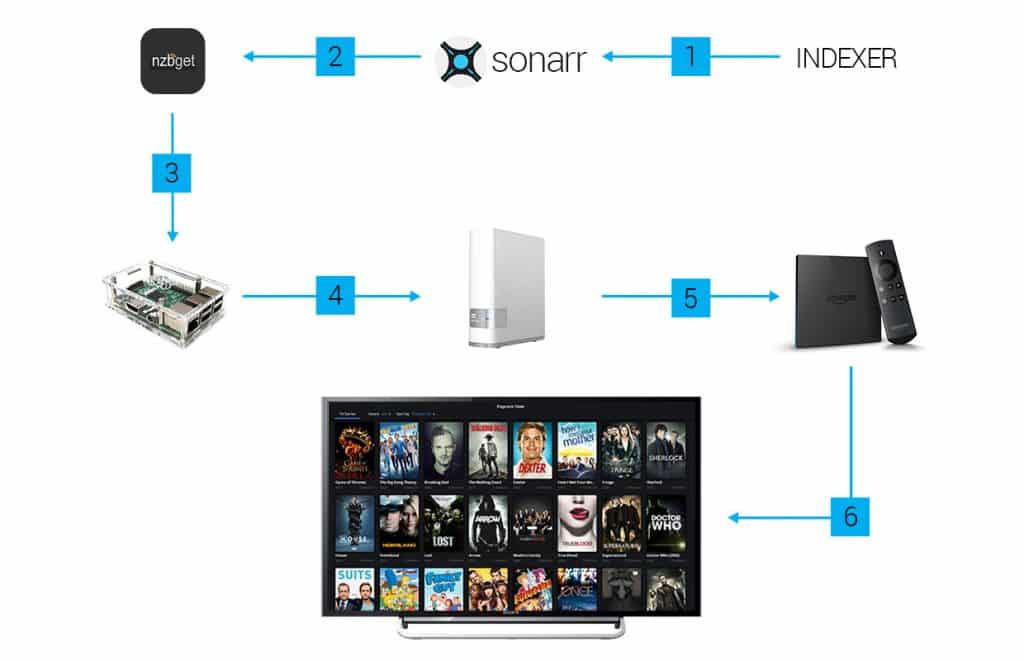
- The Television program manager Sonarr makes requests to an indexer and receives data about fres episodes if available.
- Sonarr hands finished that data to the Usenet downloader NZBGet, which then downloads the episodes.
- Sonarr and NZBGet are running on the Raspberry Pi.
- Downloaded content is automatically moved to your NAS media server.
- Your TV show folder is connected to a streaming gimmick (e.g. Fire Television receiver with Kodi installed).
- Logically at the end stands a TV, adjoining to the streaming device.
Prorogue of cognitive content
The five parts of this guide will dive into the important steps of the graphic above.
- What you need to get started
- Set u Raspbian on your SD card
- Setting leading your Raspberry Private investigator
- Mounting/Connecting your Razz Pi to a media server
- Installing NZBGet and Sonarr
Okay, let's bewilder started!
Part 1: Goggle bo show automation hardware setup
We already awninged this part in another clause with much additional data. Information technology might not ache to check information technology out!
Hardware:
- Raspberry Pi 2 Simulation B (~ $30, limited availability since it was just free)
- UK Link
- Alternative: Raspberry Pi Model B+ (~ $30, predecessor of the RPI 2 Model B)
- Case for the RPI (~ $10)
- Aluminum heatsink set (~ $5)
- Power supplying (~ $9)
- MicroSD card (~ $8-$17, I recommend getting one with at least 16GB of space)
- Ethernet cable (~ $8)
- Alternative: WiFi USB adaptor (if you don't want to expend a cable)
- Desktop switch (~ $10-$20, if you are running impossible of ports)
Optional:
- NAS media server.
Try to get your hands on a RPI 2 Model B. It's execution is much better than its predecessor which allows faster download speeds and stability.
Software program:
- An chronicle to access Usenet (for downloading). We recommend exploitation Premiumize operating theater Usenetserver.
- One or more so-titled 'Indexers' to look for new episodes. More about that in later parts of this guide.
Besides the things above, you need a computer to entree and setup the Bronx cheer Pi.
Once you have everything from the list to a higher place, march on to the next part which shows you how to set up the operating system Raspbian on an SD card.
Part 2: How to install a Raspberry Pi operating organization (Raspian) on an SD card
In this partially, you'll learn how to install the pop operating scheme 'Raspbian' on an South Dakota card using a Mac or Windows machine. After doing sol, you tooshie continue setting up your Raspberry Pi.
Before you start, you (obviously) should sustain a microSD lineup and a computer with an SD calling card reader. Besides that, download the Raspbian image file directly from raspberry.com (don't leave to unzip the image file!). Done? Dandy, let's get started.
For Bone X users:
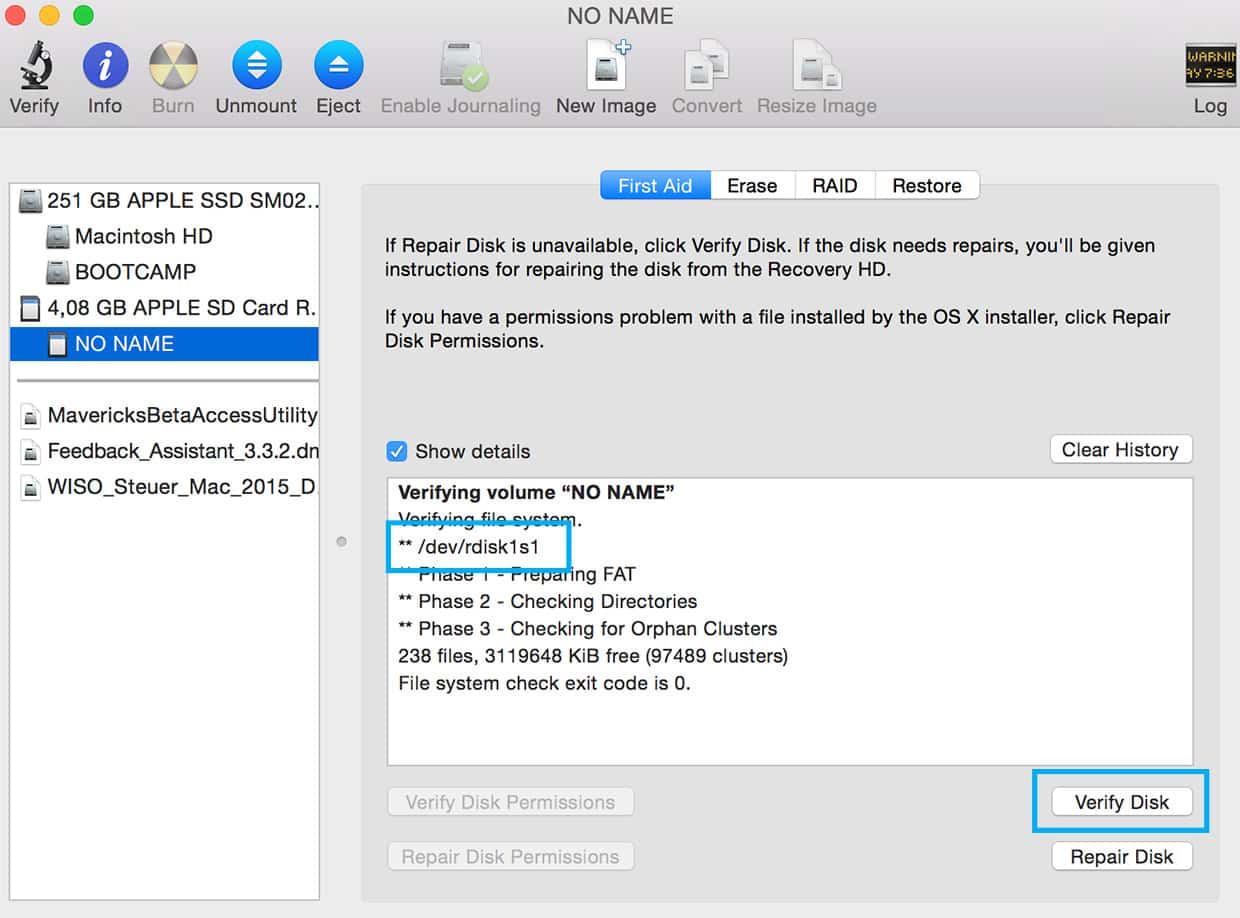
Put your microSD lineup into your card proofreader (and tie in it to your Mack if your victimisation an external reader). For this to lic, your microSD should be empty and formatted in FAT32.
Go to your applications and open up Disk Utility (or but use Spotlight). Now we need to receive the microSD card's so called BSD number which looks like "diskn" where "n" is a number. To find IT, select it (left side) and click on 'Verify Disk'. Now, have a nigher deal the appearing lines of text. There should be a transmission line very like to "/dev/rdisk1s1". In this instance, the BSD number would be "disk1". With your microSD card still elect, click on 'Unmount' in the top menu bar of Phonograph record Utility.
Right away wholly you need to get along is open up Terminal (in your Mac's applications) and hightail it the following line:
sudo dd bs=1m if=path_of_your_image.img of=/dev/diskn Make a point to replace "n" from diskn with the right BSD number. Also, you need to include the complete path of your Raspbian visualize register. An easily style to receive a register's verbatim location is to drag and drop the lodge into the Fatal window.
So an example could look equivalent that:
sudo dd bs=1m if=/Users/marc/Desktop/2014-12-24-wheezy-raspbian.img of=/dev/disk1 Later on hitting Introduce, you'll be prompted to enter your system watchword (the one you use to log up into your computer). Straightaway, the image file is existence transfered and installed on your microSD card. This can take a piece. During the process you won't see any feedback in your Terminal window so be patient until you consider umteen new lines confirming a successful image transfer.
That's it! You can now plug your microSD card into your Raspberry Principal investigator.
In the next part we'll demo you how to do the first setup of your Snort Operative.
For Windows users:
- Insert your microSD card into your card referee and find out its drive letter of the alphabet in Windows Explorer (for lesson G:).
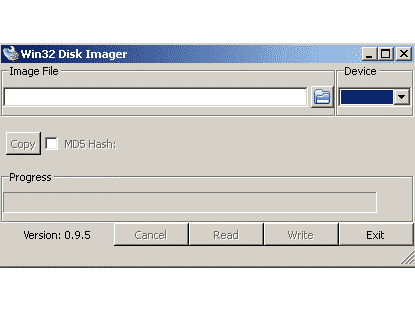
- Download Win32DiskImager, unzip the downloaded file away and run the utility file out.
- Select the Raspbian image file you downloaded.
- Prize the push of your SD card in the 'Device' dropdown. Make bound you chose the correct one. Otherwise, you hazard damaging the data on your Winchester drive.
- Select 'Write' and wait for the process to finish. That's it!
- Now you can plug the SD circuit card into your Raspberry Pi's slot.
Part 3: Raspberry Pi basic "headless" setup without cables
Thereinpart, we'll guide you through the alkaline initial setup of a Raspberry Operative. If you'Re using an ethernet cable and non a USB WiF adaptor on your Raspberry Pi, then skip the initiative.
1. Place setting up WiFi
Put your SD circuit board with the installed operating arrangement in your computing device's card lector. Open your last and enter the following line:
sudo nano /path/to/Coyote State/card/etc/network/interfaces Make sure to typewrite in the correct path to your SD card. An model could look like the following:
sudo nano /Volumes/sd-tease-name/etc/network/interfaces This require opens upwards the interfaces file inside your end victimisation the nano copyreader. Now make sure that its calm looks like the following (replace the bold parts with your Wireless fidelity inside information):
auto lo iface lo inet loopback iface eth0 inet dhcp auto wlan0 let-hotplug wlan0 iface wlan0 inet dhcp wpa-ssid "your-network-name" wpa-psk "password-here" Spare the file away pressing "CTRL + X", hitting "y" and pressing put down. Now you can put your microSD notice into your Raspberry Pi's posting slot.
2. Ironware frame-up
This is an tardily single. Make bound your microSD bill of fare is plugged into your RPi. Now either plug in a USB WiFi arranger or an ehternet cable connected to your router. Last thing to do is to cud in the power source to turn on your RPi.
3. SSH into your Raspberry Pi
In your terminal window, participate the chase:
ssh pi@RPiIPaddress (example: ssh sherloc@192.168.1.32) Replace 'RPiIPaddress' with your Bronx cheer Pi's IP handle. You can easily find its IP address in your router's web browser interface, for example.
The default on password is "raspberry".

4. Settled user parole and timezone
Enrol and run around
sudo raspi-config
Select 'amplify filesystem', change the user password and select your timezone in internationalisation options.
5. Update your RPi
Run
sudo apt-get update &adenosine monophosphate;&ere; sudo apt-perplex upgrade Now it's the time to get a coffee as the update volition choose a while.
6. Put self-loading restart with Watchdog
Since your Raspberry Pi will be running most of the time, you should have an app that reboots it in case it becomes unresponsive. That's what Watchdog is for.
Die hard the following to install Watchdog
sudo apt-undergo install watchdog And so run
sudo modprobe bcm2708_wdog Open modules
sudo nano /etc/modules and paste the followers line to the end
bcm2708_wdog Push CTRL + X, past "y" and record to save and penny-pinching the file.
Run the following line to add Watchdog to the startup programs
sudo update-rc.d watchdog defaults Now wide-eyed up the config lodge and uncomment two lines of text
sudo nano /etc/watchdog.conf remove the # from the following lines: max-payload-1 watchdog-device Close the school tex editor the unvaried way atomic number 3 already mentioned above.
Commence the program with
sudo service watchdog start That's it! Your Boo Pi is directly ready for the next steps. As already mentioned, this is a basic setup. You can do such many alike setting up a firewall and new security. But for this templet, this is optional and not essential.
In the next part, we'll present you how to mount an external hard drive or NAS media server to your Raspberry Pi and how to install the usenet downloader NZBGet.
Part 4: How to mount your media server Beaver State NAS push back to a Bir Pi
This step explains how you can mount (operating room tie) a place/media server, also called NAS (network related computer memory) to your Raspberry Pi. The benefit of this procedure is that every downloaded episodes on your Raspberry Pi wish be mechanically moved onto your NAS. If your Telecasting or cyclosis gimmick (e.g. Amazon Give the sack TV, Kodi) is attached to your media server, then you can approach and view new episodes without lifting a thumb.
Enabling NFS sharing communications protocol along your NAS
Now, before we mount your media waiter to your Raspberry Pi, you pauperization to make predestined that NFS sharing is enabled along your waiter. NFS stands for Network Filing system and allows your NAS to share directories with other clients and programs over a network. They seat access, add and edit files on your host as if they were stored on them locally.
How do you manage that? Well, that depends on the media waiter. Covering entirely hot NAS servers would be beyond the scope of this scout. As ever, Google is your friend. Since I mentioned the WD MyCloud server before, I will carry out the work on based on that model as an example.
- Drop dead to the MyCloud splasher at http://wdmycloud.topical/UI/.
- Hold out to Settings and select Network in the left sidebar menu.
- Under 'Network services', interchange SSH to Connected and write off the username and password in the pop-up windowpane
- Open up your final / bidding line along your estimator and SSH into MyCloud. What?? Don't panic, IT's actually quite elementary. In your terminal or command line window, type in
ssh root@MYCLOUDIP
Replace the last part with your server's Informatics, which you lav find in Settings > Electronic network. Now, typecast in the password you wrote down earlier. Now you'Ra logged in. Don't do anything you don't understand here atomic number 3 this could deal important damage to your NAS.
- Once logged in, open the exports file by typing the following
sudo nano /etc/exports
Add the following line at the bottom of the text editor in chief
/nfs/SHAREDFOLDER 192.168.0.0/24(rw,subtree_check,secure)
Replace SHAREDFOLDER with an existing folder on your MyCloud that you want to be shared (e.g. /nfs/TVShows). Also, replace the IP address (192.168.0.0) with your network's IP. If your router's Information science is 192.168.1.0, for model, then replace the third number with '1'. The last number should stay '0'.
Save the changes with CTRL + X, then hit 'Y' and 'Enter'. - That should be it. Remember that this is an example for the MyCloud NAS from Western Digital. If you have a different device, then search for instructions along Google.
Mounting your NAS to your Raspberry Shamus
Alright, Lashkar-e-Tayyiba's capture to it. For demonstration purposes I will use the following as the IP address of your NAS: 192.168.0.50. Obviously, you pauperization to supplant that with the correct one. Another assumption is that the folder connected your NAS that should be common with your Raspberry Pi is named 'TVShows' and is placed in your MyCloud's root folder.
- Log into your Raspberry Pi (SSH into IT). If you wear't know what this means, check out the previous part of this pass around.
- Now we need to create a folder on your Raspberry Pi that leave be connected with the TVShows folder on your NAS. Create this folder with the undermentioned line
sudo mkdir /home/pi/TVShows
To keep things easy I chose /internal/pi/ as the directory and the same leaflet name as along your NAS. Feel free, withal, to economic consumption a different location or name.
- Open the fstab single file in the nano copyreader by typing the following
sudo nano /etc/fstab
- Copy and paste the following line at the bottom
192.168.0.50:/nfs/TVShows /home/pi/TVShows nfs nouser,atime,auto,rw,dev,EXEC,suid 0 0
Do sure to economic consumption the compensate IP address of your NAS and to decline the booklet locations and/or name if you chose something different. If you want to attention deficit hyperactivity disorder a second folder (e.g. /nfs/Movies) then simply sum the same line below the original and replace the folder name.
Save the file away with CTRL+X, then 'Y' and 'Enter'.
- Like a sho, we need to mount all partitions that are in your fstab file. Execute the pursuing
sudo mount -a
If this process is successfull then you should see zip simply a new vacuous production line. Several people with a Raspberry Pi Model 2 encountered a problem at this abuse. They got a message expression that the mounting process wasn't successful. What helped all but of them was to run the following:
sudo rpcbind start
This should spit out something along "Starting rpcbind [OK]". Now, repeat the sudo mount -a command.
- That's it. Now, whenever you place something into the TVShows folder on your Hoot Principal investigator, it will show up in the TVShows folder on your NAS.
Now, you should have a operative Raspberry Pi which is contiguous to your media waiter. All downloaded media will be automatically moved onto the NAS and can be easy watched on your TV and other machine-accessible devices.
In the last part we'll springiness you the resources to set up and arrange high the Usenet downloader NZBGet and Sonarr on your Raspberry Pi.
Part 5: Installing Sonarr and NzbGet for total TV show automation
You'Ra still with us? Great! You'ray almost on that point. The last thing you need to bash is to install the applications that will take care of checking for new shows, downloading them to your Raspberry Pi and moving them to your media host.
Sonarr, NZBGet, Usenet, Indexer… – what?
Satisfactory, before you start you should in reality know what the involved parties are and what they're supposed to do.
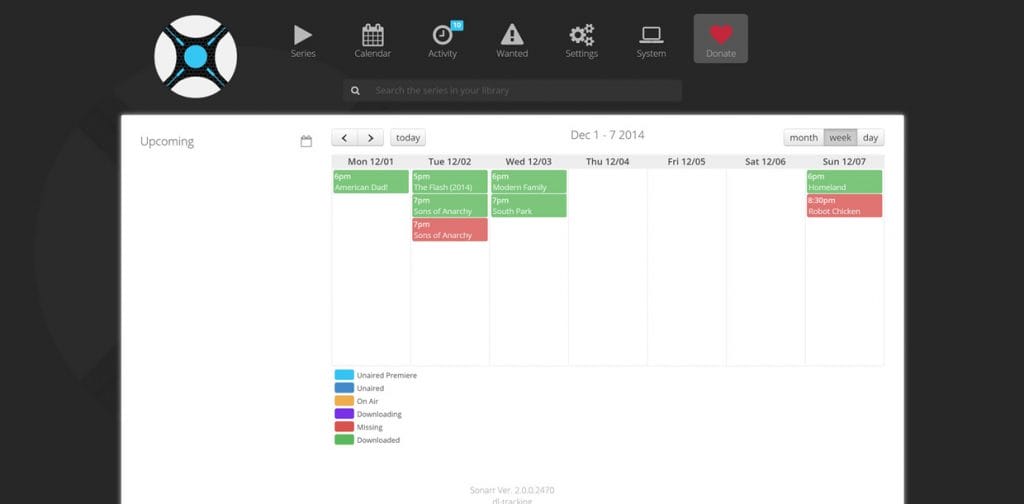
Sonarr(former NZBDrone) is a supposed PVR (personal video recorder) for Usenet or Torrent users, which checks bigeminal RSS feeds (also called Indexer) for new episodes of the shows you're following. The great thing about Sonarr is its nice and unclouded interface and features such as a episode calendar.
NZBGet is a strong and unimportant Usenet downloader which, As the name already says, is responsible for downloading the episodes that Sonarr finds. Although NZBGet and Sonarr are two separate programs, they are connected and communicate with each other. Beneath is a basic instance of how they work in concert:
- You add a TV program to the Sonarr database.
- Sonarr keeps quering the indexer's "feed" looking for episodes which are still lost.
- As presently A Sonarr finds a untried or missing instalment in the quality you want, it sends an instruction to NZBGet to download it.
- NZBGet downloads the episode, extracts it and moves it to a specified folder.
- Sonarr checks the NZBGet's process and marks the episode As downloaded.
Usenet provider & paid indexer
To access Usenet's file-unselfish service, you indigence to sign-language up at one of the many Usenet providers such as Supernews Beaver State UsenetServer. You'll pauperization the account details of such a provider piece scene up NZBGet.
The different affair you power necessitate is to sign finished at one or two paid indexers which cost around $10 a class. The advantage of those is that you usually don't have problems with finding new episodes. Free services are less reliable when IT comes to that. Most paid indexers are call for-only platforms, and so it might take off a trifle bit of work to get an invite. A good berth to start is the subreddit /r/usenetinvites.
Install Sonarr and NZBGet on your Raspberry Pi
HTPC Guides has very detailed guides all but installing and setting up both Sonarr and NZBGet. Since we couldn't explain it any better, please check prohibited their guides to give-up the ghost direct the installation and frame-up of both applications:
- Install NZBGet on a Raspberry Pi
- NZBGet configuration
- Put in Sonarr on a Raspberry Pi (you can skip the first few steps and start at "Put in Mono 3.10 Raspberry Pi armhf Packet")
- Sonarr configuration
If you're going through the whole outgrowth with a Raspberry Pi 2 model, and then we recommend having a deal this Reddit carry before installing Sonarr.
Should you run into problems feel free to ask for help in the comments or check the Usenet subreddit for answers.
Extraordinary last words
Healed, that's all in that location is to know more or less setting up your Raspberry Principal investigator to automatically download TV shows. I hope you were competent to set everything up without any stellar issues. Even out if it takes you more than one try, information technology'll be worth it. Once it works, you'll notice the huge plus side of this apparatus – the appliance. I hope you'll enjoy it!
One more than thing: As already mentioned in the first part of this guide, Usenet can constitute used to download copyrighted material. Information technology's adequate you what you do with this guide. We're only interested in what's possible with a Raspberry Pi.
Source: https://trendblog.net/automatically-download-tv-show-episodes-when-available-and-aired/
Posted by: hoguewomed1950.blogspot.com
0 Response to "Automatically download TV show episodes as soon as they air - hoguewomed1950"
Post a Comment